
Founder and editor of We Are MacWise, with more than 30 years of Apple-focused IT experience helping professionals and small businesses.
A 2023 Consumer Intelligence Research Partners study found that iPhone owners keep their devices for an average of 3.6 years. That means the decisions made during the first 30 minutes of setup will shape how well the phone performs — and how secure your data stays — for years. Knowing how to set up a new iPhone the right way from day one is not just a convenience; it is a meaningful investment in your digital life.
This guide walks through every critical decision in sequence, explains why each step matters, and flags the choices that are easy to overlook but difficult to fix later.
Key Takeaways
- Use Quick Start if you have an existing iPhone nearby — it transfers settings, apps, and data in one step.
- Sign in with your Apple Account early; nearly every useful feature depends on it.
- Set up Face ID before leaving the setup assistant — it cannot be properly configured mid-session.
- Choose iCloud Backup or a local encrypted backup via Finder; do not skip backups entirely.
- Review location and privacy permissions during setup rather than accepting defaults blindly.
- Enable two-factor authentication on your Apple Account if it is not already active.
- Defer non-essential app downloads until the core configuration is complete.
- Take five minutes to configure Screen Time and Focus modes before handing the device to anyone else.
What Should You Do Before You Even Power It On?
Before unboxing, confirm two things: your Apple Account credentials and your backup plan. If you are migrating from an older iPhone, make a fresh iCloud backup of that device first — go to Settings → [Your Name] → iCloud → iCloud Backup → Back Up Now. Verify the backup completed by checking the timestamp.
If you are switching from Android, download the Move to iOS app on your Android device. It creates a private Wi-Fi connection between the two phones and transfers contacts, message history, photos, and some app data. It is not perfect, but it is significantly better than starting from nothing.
Also confirm that your carrier SIM or eSIM plan is active. Most iPhone 15 and iPhone 16 models in the United States are eSIM-only, so a physical SIM card is no longer part of the equation — but your carrier account still needs to be ready.
How Does the Quick Start Transfer Actually Work?
Quick Start is Apple’s device-to-device migration tool, and for most users it is the right choice. Hold your old iPhone near the new one during the initial setup screen. A circular animation appears on the new device; point your old iPhone’s camera at it to authenticate. You then choose whether to transfer directly over Wi-Fi or restore from an iCloud backup.
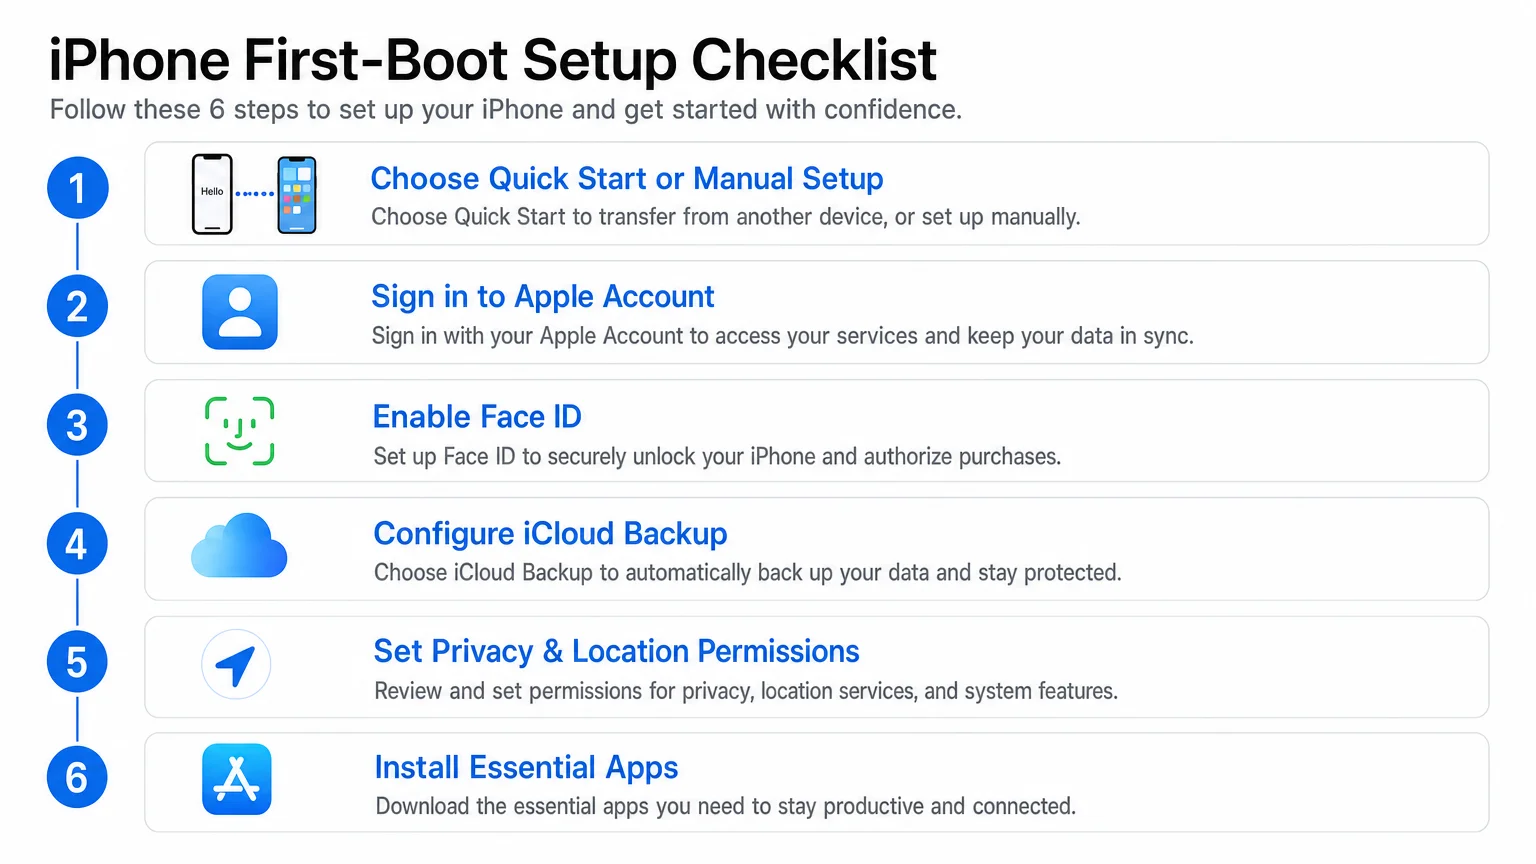
Direct transfer is faster if both devices are on the same Wi-Fi network and can stay plugged in. iCloud restore is more reliable if the old phone is unavailable or running an older iOS version. Either way, the result is a new iPhone that mirrors your previous environment — apps, settings, wallpapers, and most passwords included — rather than a blank slate requiring hours of manual reconfiguration.
One important note: app data from some third-party applications does not transfer unless those apps use iCloud or their own cloud sync. Password managers, banking apps, and authenticator apps often require re-authorization after migration regardless of method.
Which iCloud Settings Are Worth Enabling Right Away?
iCloud is the connective tissue of the Apple ecosystem, and configuring it thoughtfully during setup avoids confusion later. After signing in with your Apple Account, the setup assistant presents a list of iCloud services to enable. Here is a practical breakdown:
| iCloud Feature | Recommended Action | Why |
|---|---|---|
| iCloud Backup | Enable | Automatic daily backup when plugged in and on Wi-Fi |
| Photos (iCloud Photos) | Enable if you want cross-device sync | Stores originals in the cloud, saves local storage |
| iCloud Drive | Enable | Syncs Documents and Desktop from Mac automatically |
| iCloud Keychain | Enable | Syncs passwords and passkeys across Apple devices |
| Find My iPhone | Enable | Essential for device recovery and Activation Lock |
| iCloud Mail | Optional | Only relevant if you use an @icloud.com address |
| Health | Enable if you use Apple Watch | Syncs health data across devices |
If iCloud storage is a concern — the free tier is 5 GB, which fills quickly — consider upgrading to iCloud+ before the first backup runs. The 50 GB tier costs $0.99 per month in 2026 and is sufficient for most single-device users.
How Should You Handle Privacy Permissions During Setup?
The setup assistant asks for location access, analytics sharing, and Siri permissions in quick succession. Most people tap through without reading. That is worth slowing down for.
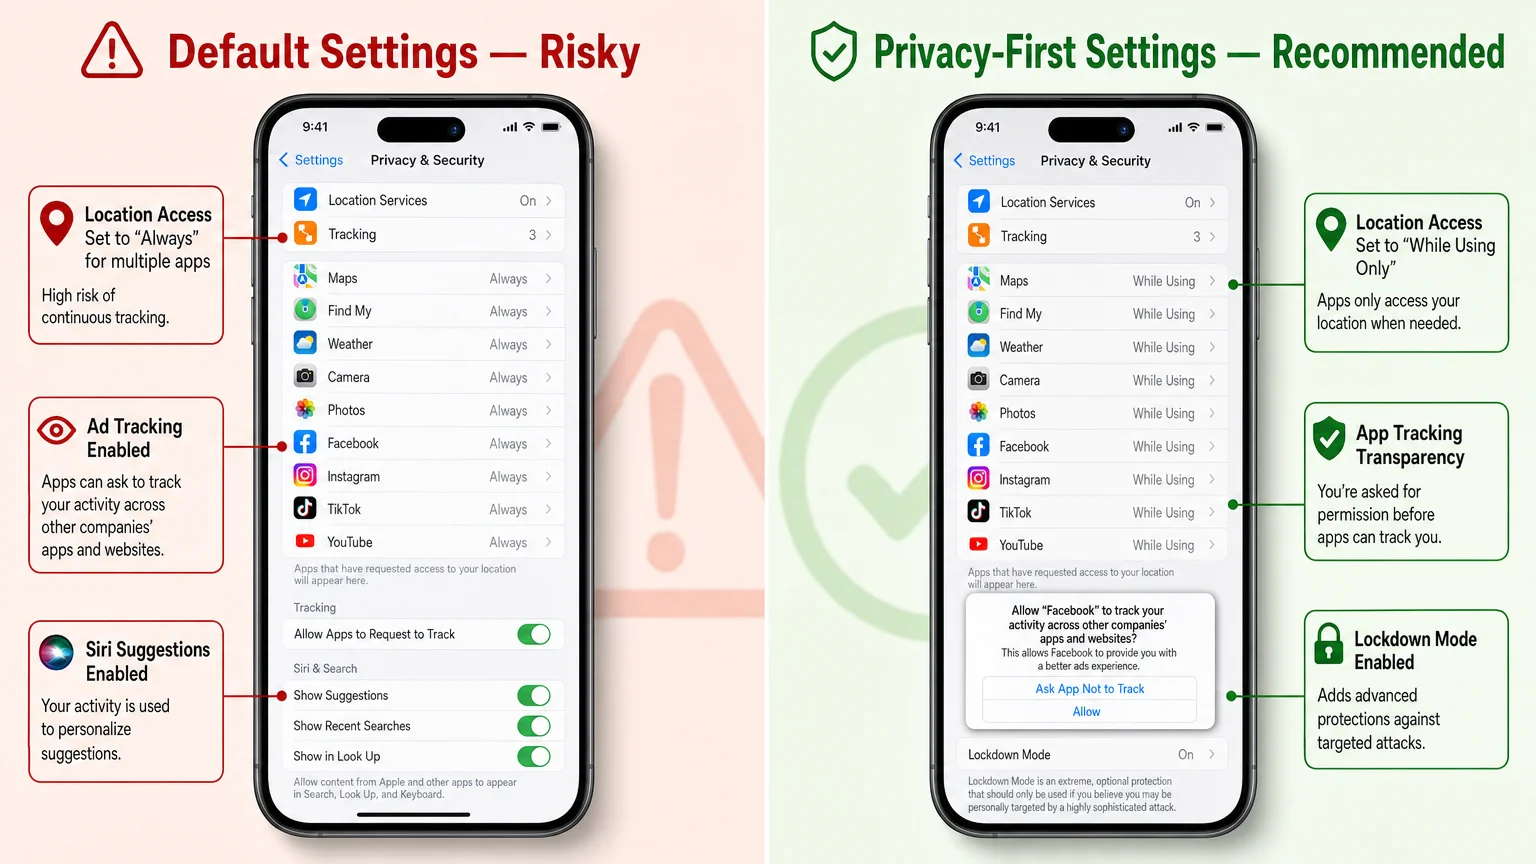
Location Services: Enable them, but plan to audit individual app permissions afterward. Go to Settings → Privacy & Security → Location Services and set non-essential apps to “While Using” rather than “Always.” Maps, Weather, and Find My are the apps that genuinely benefit from background location access.
Analytics & Improvements: Sharing iPhone analytics with Apple is low-risk, but sharing it with app developers is broader. Disable “Share with App Developers” unless you have a specific reason to contribute.
Apple Advertising: Under Settings → Privacy & Security → Apple Advertising, you can disable personalized ads. This does not reduce the number of ads you see in the App Store; it only affects how they are targeted.
For a more thorough approach to locking down permissions after setup, the guide on how to set up a privacy-first iPhone in 2026 covers every toggle worth reviewing.
What Security Steps Should Come First?
Two-factor authentication (2FA) on your Apple Account is non-negotiable. If it is not already enabled, the setup assistant will prompt you to add a trusted phone number. Do it. Without 2FA, your Apple Account — and everything attached to it — is protected only by a password.
Beyond 2FA, configure these during or immediately after setup:
- Face ID: Add a second appearance under Settings → Face ID & Passcode → Set Up an Alternate Appearance if you wear glasses or a mask regularly.
- Passcode: Use a six-digit numeric code at minimum. A custom alphanumeric code is stronger.
- Stolen Device Protection: Introduced in iOS 17, this feature requires Face ID or Touch ID for sensitive actions when the phone is away from familiar locations. Enable it under Settings → Face ID & Passcode → Stolen Device Protection.
- Automatic Updates: Turn on both iOS updates and security response updates under Settings → General → Software Update → Automatic Updates.
If your work involves sensitive client data or you manage a team on Apple devices, the article on how small businesses can use Apple Business Essentials covers MDM enrollment and managed Apple IDs, which require a different setup path.
What Apps and Settings Should You Configure Before Anything Else?
Once the core setup is complete, resist the urge to immediately download every app you used on your previous phone. Instead, spend ten minutes on configuration that is harder to revisit later:
- Focus Modes: Set up at least a Work and a Sleep focus under Settings → Focus. These filter notifications and can be scheduled automatically.
- Screen Time: If the device will be used by a child, or if you want usage limits for yourself, configure Screen Time now before habits form.
- Default Apps: iOS 18 allows changing default browser, email, messaging, and calling apps. Set these under Settings → Apps → [App Name] → Default [App] App.
- Notification Permissions: When apps request notification access for the first time, be deliberate. Allowing everything creates noise; allowing nothing means missing important alerts.
- Widgets and Home Screen layout: A clean, intentional home screen reduces distraction. For a deeper look at building focused digital environments, the guide on how to build a distraction-free writing workflow on Mac applies many of the same principles across Apple devices.
For users curious about what Apple Intelligence features are available on their specific model, the breakdown in Apple Intelligence: what it does, doesn’t, and who it’s for is worth reading before enabling or dismissing those features during setup.
Getting the Foundation Right
Setting up a new iPhone correctly from day one is less about following a rigid checklist and more about making deliberate choices at each step rather than tapping through defaults. The decisions made in the first session — backup method, privacy permissions, security configuration, and iCloud setup — compound over time. A phone configured thoughtfully in the first hour is more secure, more organized, and more useful three years later than one that was rushed through activation.
For readers who want to go further, the companion guide on how to set up a new iPhone the right way from day one expands on several of these topics with additional detail. And if you are building out your broader Apple setup, the Accessories & Gear section covers the cases, chargers, and peripherals worth pairing with a new device.
Frequently Asked Questions
Should I use Quick Start or set up the iPhone as new?
Use Quick Start if you are migrating from an existing iPhone and want to preserve your apps, settings, and data. Set up as new only if you want a completely clean environment or are troubleshooting persistent software issues from your old device.
Does it matter which Apple ID I use during setup?
Yes. The Apple ID used during setup becomes the account tied to purchases, iCloud storage, and device management. Use your primary personal Apple ID, not a work-managed or family-shared account, unless you specifically intend that arrangement.
Can I change iCloud settings after the initial setup?
Yes. Every iCloud option presented during setup can be changed later under **Settings → [Your Name] → iCloud**. Nothing is permanent, but configuring it correctly from the start avoids gaps in backup history.
What happens if I skip Face ID setup during the initial process?
You can set it up later under **Settings → Face ID & Passcode**. There is no functional penalty for delaying it, but the phone will rely solely on your passcode until Face ID is configured.
Is it safe to restore from an iCloud backup on a new iPhone?
Yes. iCloud backups are encrypted in transit and at rest. Restoring from a recent backup is the standard and recommended migration path for most users.
How long does the Quick Start transfer take?
It depends on how much data is being transferred and your Wi-Fi speed. A typical transfer of 50–100 GB can take 30 minutes to two hours. Keep both devices plugged in and on the same Wi-Fi network throughout.
Should I update iOS immediately after setup?
Yes, if an update is available. Go to **Settings → General → Software Update** and install any pending updates before installing third-party apps. This ensures you are running the most current security patches from the start.
What should I do if my old iPhone is no longer available for Quick Start?
Restore from your most recent iCloud backup during the setup process. If no iCloud backup exists, you will need to set up the device as new and reinstall apps manually.
Founder and editor of We Are MacWise, with more than 30 years of Apple-focused IT experience helping professionals and small businesses.
